1. 이벤트
- 사용자가 버튼을 클릭한다거나, 마우스를 움직이거나, 키를 누르면 발생
- 이벤트 리스너 : 발생된 이벤트 객체에 반응하여 이벤트를 처리하는 객체
2. 이벤트 처리 과정
1) 이벤트 리스너 작성
class MyListener implements ActionListener {
    public void actionPerformed (ActionEvent e) {
        // Action event 처리
        // 이벤트 객체가 발생하면 호출됨!
    }
}
2) 이벤트 리스너를 컴포넌트에 등록
public class MyFrame extends JFrame {
    JButton button;
    ...
    public MyFrame() {   // 생성자에서 컴포넌트 생성, 추가
        button = new JButton("동작");
        button.addActionListener(new MyListener());   // 이벤트 리스너 객체 생성, 등록
        ...
    }
}
3. 이벤트 객체
- 이벤트 객체는 발생된 이벤트에 대한 모든 정보를 리스너로 전달
- 이벤트 객체는 getSource() 액션 이벤트가 발생하면 호출됨
public void actionPerformed(ActionEvent e) {
    button = (JButton)e.getSource();
    ...
}
4. 이벤트 처리기 위치
1) 독립적인 클래스로 이벤트 처리기 작성
2) 내부 클래스로 이벤트 처리기 작성
import javax.swing.*;
import java.awt.*;
import java.awt.event.*;

public class EventTest1 extends JFrame {
    private JButton button;
    private JLabel label;
    int counter = 0;

    class MyListener implements ActionListener {       // 리스너 클래스
        public void actionPerformed(ActionEvent e) {
            counter++;
            label.setText("현재 카운터값: " + counter);
        }
    }

    public EventTest1() {     // 생성자
        setSize(400, 150);
        setLayout(new FlowLayout());
        button = new JButton("증가");
        label = new JLabel("현재 카운터값: " + counter);

        button.addActionListener(new MyListener());  // 리스너 컴포넌트에 등록
        add(label);
        add(button);
        setVisible(true);
        setDefaultCloseOperation(EXIT_ON_CLOSE);
    }

    public static void main(String[] args) {
        new EventTest1();
    }
}
3) 프레임 클래스에 이벤트 추리 구현
- JFrame 상속받으면서 동시에 ActionListener 인터페이스 구현
- 리스너 클래스 없이 바로 함수가 나온 것
public class EventTest2 extends JFrame implements ActionListener {
    private JButton button;
    private JLabel label;
    int counter = 0;

    public void actionPerformed(ActionEvent e) {
        counter++;
        label.setText("현재 카운터값: " + counter);
    }

    public EventTest2() {
        this.setSize(400, 150);
        button = new JButton("증가");
        label = new JLabel("현재 카운터값: " + counter);

        button.addActionListener(this);
        add(label);
        add(button);
        setVisible(true);
        setDefaultCloseOperation(EXIT_ON_CLOSE);
    }

    public static void main(String[] args) {
        new EventTest2();
    }
}
4) 익명 클래스 사용
- 한 번만 사용할 때
- 클래스가 정의되면서 바로 사용
- 안드로이드 프로그래밍에서도 자주 사용됨
public class EventTest3 extends JFrame {
    private JButton button;
    private JLabel label;
    int counter = 0;

    public EventTest3() {
        this.setSize(400, 150);
        button = new JButton("증가");
        label = new JLabel("현재 카운터값: " + counter);

        button.addActionListener(new ActionListener() {      // 익명 클래스 - 바로 정의
            public void actionPerfomed(ActionEvent e) {
                counter++;
                label.setText("현재 카운터값: " + counter);
            }
        });

        add(label);
        add(button);
        setVisible(true);
        setDefaultCloseOperation(EXIT_ON_CLOSE);
    }
}
- 일반 클래스와 익명 클래스 비교
| 익명 클래스 | 일반 클래스 |
| ActionListener obj = new ActionListener() { ... }; |
class MyListener implements ActionListener { ... } MyListener obj = new MyListener(); |
5) 람다식 이용
- 람다식 : 이름이 없는 메소드 -> 간결함
(int a, int b)   ->    { return a + b; }
// 메소드 시그니처 람다연산자    메소드 구현
public class EventTest4 extends JFrame {
private JButton button;
private JLabel label;
int counter = 0;
public EventTest4() {
this.setSize(400, 150);
button = new JButton("증가");
label = new JLabel("현재 카운터값: " + counter);
button.addActionListener(e -> { // 람다식
counter++;
label.setText("현재 카운터값: " + counter);
});
add(label);
add(button);
setVisible(true);
setDefaultCloseOperation(EXIT_ON_CLOSE);
}
}
5. 스윙 컴포넌트의 이벤트
1) 저수준 이벤트 : 모든 컴포넌트가 공통적으로 지원
- Mouse, MouseAction, Key, Component, Container, Focus, Window

2) 의미적 이벤트 : 일부 컴포넌트만 지원
- Action, Adjustment, Document, Item, Text
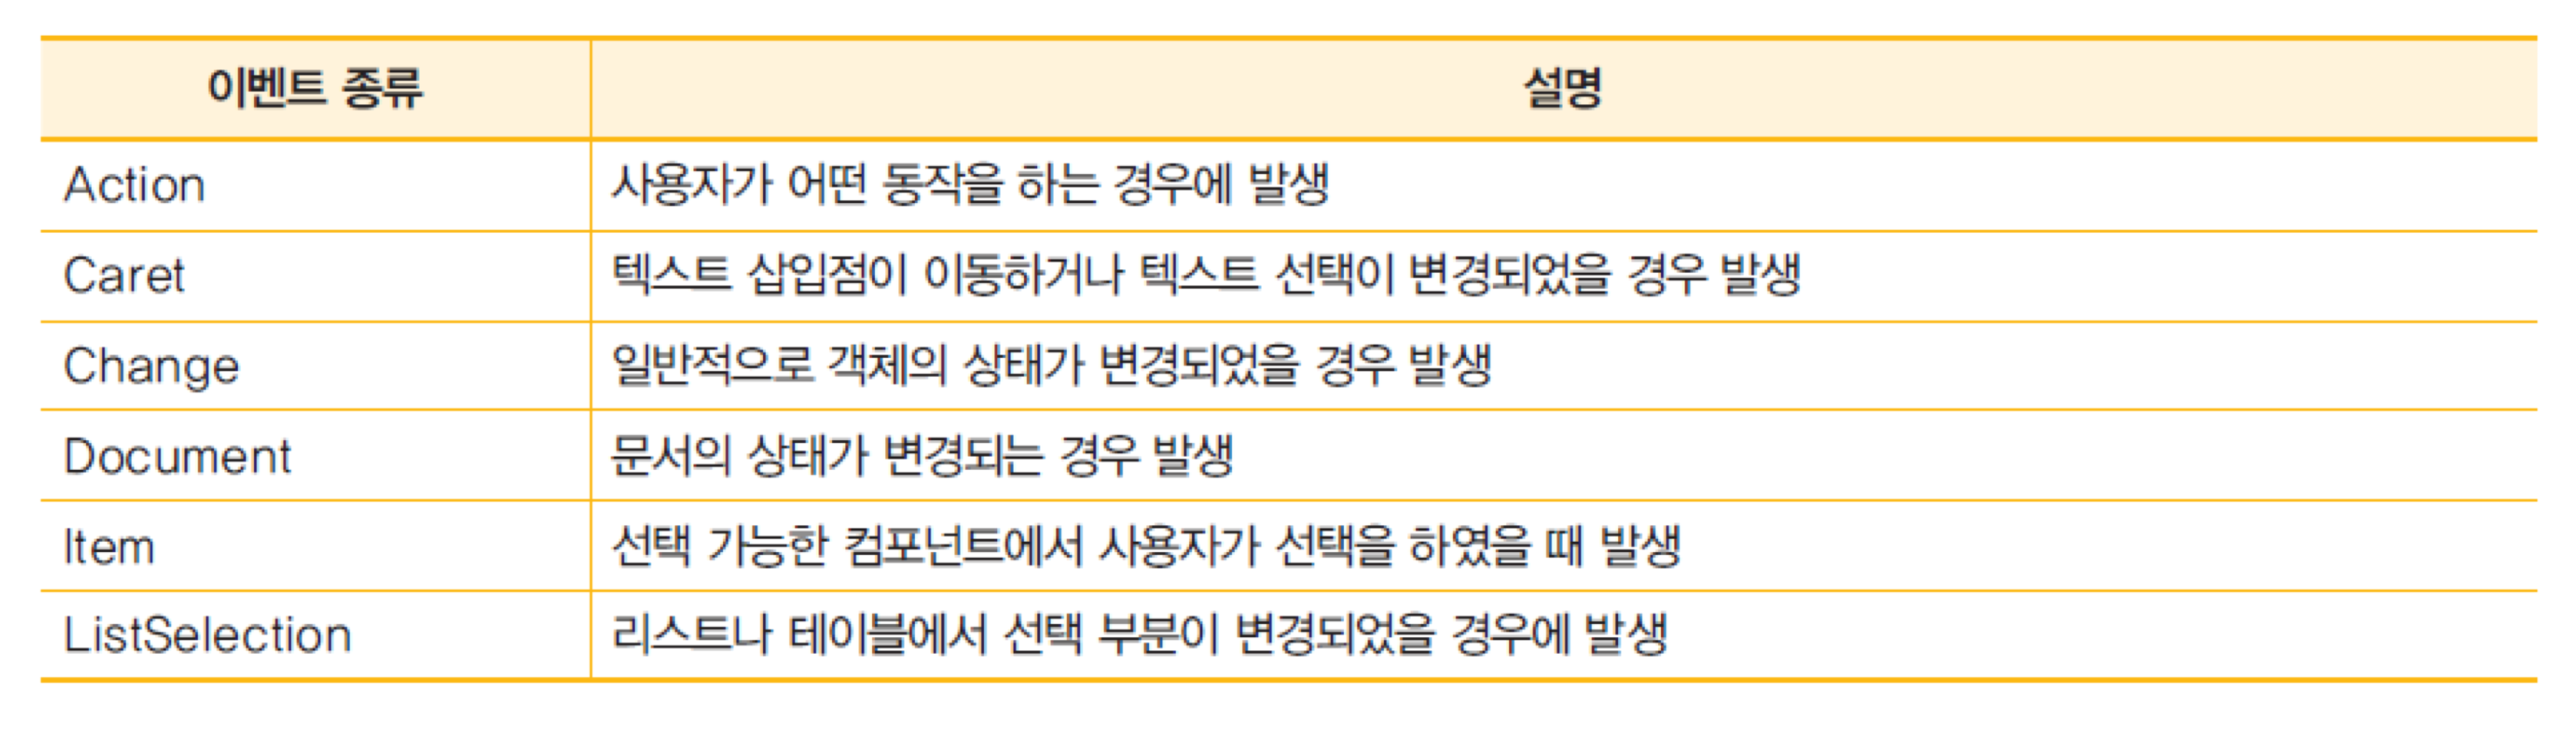
6. 액션 이벤트
- 사용자가 버튼을 클릭하는 경우
- 사용자가 메뉴 항목을 선택하는 경우
- 사용자가 텍스트 필드에서 엔터키를 누르는 경우
예제 1) 패널 배경색 바꾸기
// 익명클래스

import javax.swing.*;
import java.awt.*;
import java.awt.event.*;

public class ChangeBackground extends JFrame {
    private JButton button1;
    private JButton button2;
    private JPanel panel;

    public ChangeBackground() {
        panel = new JPanel();
        button1 = new JButton("노란색");
        button2 = new JButton("분홍색");

        button1.addActionListener(new ActionListener() {
            public void actionPerformed(ActionEvent e) {
                panel.setBackground(Color.yellow);
            }
        });

        button2.addActionListener(new ActionListener() {
            public void actionPerformed(ActionEvent e) {
                panel.setBackground(Color.pink);
            }
        });

    	panel.add(button1);
        panel.add(button2);
    	add(panel);
        setSize(500, 400);
        setVisible(true);
        setDefaultCloseOperation(EXIT_ON_CLOSE);
    }


    public static void main(String[] args) {
        new ChangeBackground();
    }
}
// 내부클래스
import javax.swing.*;
import java.awt.*;
import java.awt.event.*;
public class ChangeBackground extends JFrame {
private JButton button1;
private JButton button2;
private JPanel panel;
MyListener listener = new MyListener();
public ChangeBackground() {
panel = new JPanel();
button1 = new JButton("노란색");
button2 = new JButton("분홍색");
button1.addActionListener(listener);
button2.addActionListener(listener);
panel.add(button1);
panel.add(button2);
add(panel);
setSize(500, 400);
setVisible(true);
setDefaultCloseOperation(EXIT_ON_CLOSE);
}
private class MyListener implements ActionListener {
public void actionPerformed(ActionEvent e) {
if(e.getSource() == button1)
panel.setBackground(Color.yellow);
else if(e.getSource() == button2)
panel.setBackground(Color.pink);
}
}
public static void main(String[] args) {
new ChangeBackground();
}
}
예제 2) 키패드 만들기
import javax.swing.*;
import java.awt.*;
import java.awt.event.*;

public class KeyPad extends JFrame implements ActionListener {
    private JTextField txt;
    private JPanel panel;

    public KeyPad() {
        txt = new JTextField(20);
        add(txt, "North");

        panel = new JPanel();
        panel.setLayout(new GridLayout(3,3));
        add(panel, "Center");

        for(int i = 1; i <= 9; i++) {
            JButton btn = new JButton("" + i);
            btn.addActionListener(this);
            btn.setPreferredSize(new Dimension(100, 30));
            panel.add(btn);
        }

        pack();
        setVisible(true);
        setDefaultCloseOperation(EXIT_ON_CLOSE);
    }

    @Override
    public void actionPerformed(ActionEvent e) {
        String actionCommand = e.getActionCommand();
        txt.setText(txt.getText() + actionCommand);
    }

    public static void main(String[] args) {
        new KeyPad();
    }
}
예제 3) 가위바위보
import javax.swing.*;
import java.awt.*;
import java.awt.event.*;
import java.util.Random;

public class RockPaperScissor extends JFrame implements ActionListener {
    final int SCISSOR = 0;
    final int ROCK = 1;
    final int PAPER = 2;
    private JPanel panel;
    private JLabel output, information;
    private JButton rock, paper, scissor;
    public RockPaperScissor() {
        setSize(400, 150);

        panel = new JPanel();
        panel.setLayout(new GridLayout(0, 3));

        information = new JLabel("아래의 버튼 중 하나를 선택하세요.");
        output = new JLabel("Good Luck!");

        scissor = new JButton("0: 가위");
        rock = new JButton("1: 바위");
        paper = new JButton("2: 보");

        scissor.addActionListener(this);
        rock.addActionListener(this);
        paper.addActionListener(this);

        panel.add(scissor);
        panel.add(rock);
        panel.add(paper);

        add(information, "North");
        add(panel, "Center");
        add(output, "South");
        setVisible(true);
        setDefaultCloseOperation(EXIT_ON_CLOSE);
    }

    @Override
    public void actionPerformed(ActionEvent e) {
        JButton b = (JButton)e.getSource()    // 이벤트 발생 컴포넌트 추출
        int user = Integer.parseInt(""+b.getText().charAt(0)); // 첫번째 글자 추출
        Random random = new Random();
        int computer = random.nextInt(3);

        if(user == computer)
            output.setText("비겼음");
        else if(user == (computer + 1) % 3)     // 0은 1한테 진다
            output.setText("인간: " + user + " 컴퓨터: " + computer + " 인간 승리");
        else
            output.setText("인간: " + user + " 컴퓨터: " + computer + " 컴퓨터 승리");
    }

    public static void main(String[] args) {
        new RockPaperScissor();
    }
}
7. 키 이벤트
- 사용자가 키보드를 이용하여 입력하는 경우
- keyPressed : 키를 누르면 이벤트 발생
- keyReleased : 키에서 손을 떼면 이벤트 발생
- keyTyped : 입력된 유니코드 문자 전송됨
8. 포커스
- 컴포넌트가 키 이벤트를 받으려면 반드시 포커스(focus)를 가지고 있어야 함
- 포커스 : 키 입력을 받을 권리
- 일반적으로 오직 한 개의 컴포넌트만 포커스를 가지고 있어 키 입력을 독점하게 됨
panel.setFocusable(true);
panel.requestFocus();
9. KeyListener 인터페이스
public class MyListener implements KeyListener {
    public void keyPressed(KeyEvent e) {   }
    public void keyReleased(KeyEvent e) {   }
    public void keyTyped(KeyEvent e) {    }
}
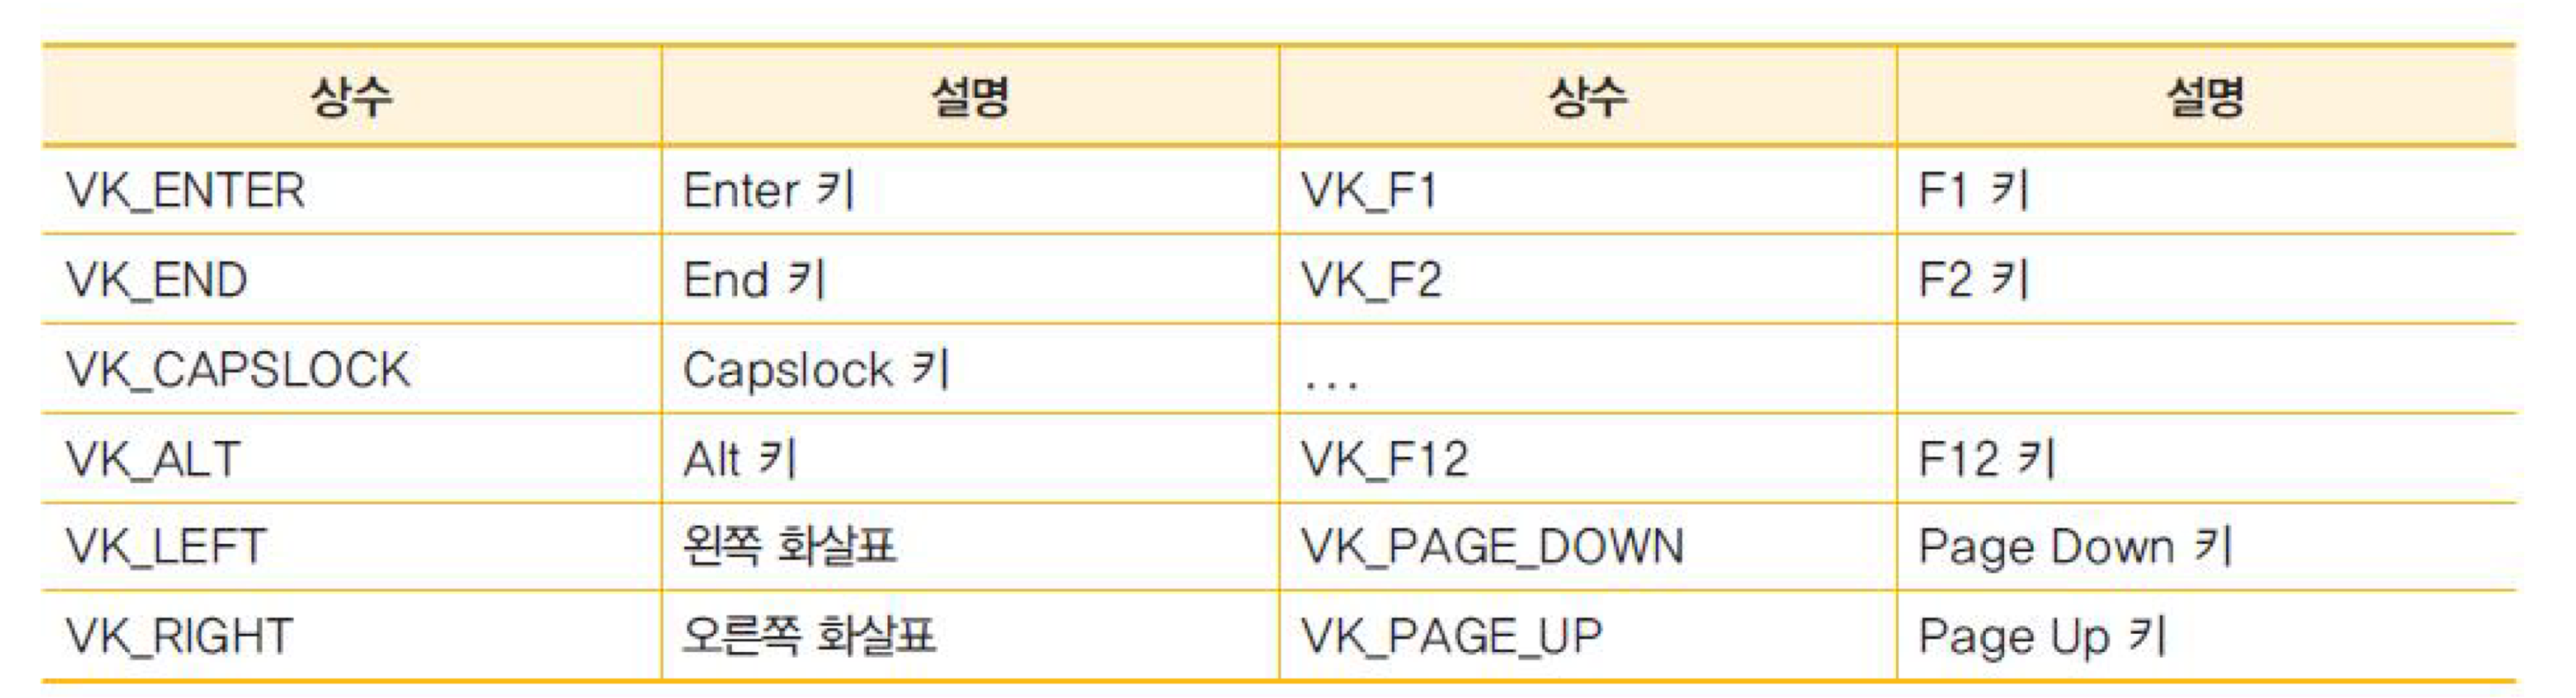
10. KeyEvent 클래스
- int getKeyChar() : KeyEvent에 들어있는 글자 (유니코드) 반환
- int getKeyCode() : KeyEvent에 들어있는 keycode 반환 (글자가 아닌, 키보드 자판의 각각의 키를 가리키는 상수)
- ex) Escape의 키코드 = VK_ESCAPE
- boolean isActionKey() : 이벤트를 발생시킨 키가 액션 키이면 true 반환
- 액션 키 : Cut, Copy, Paste, Page Up, Caps Lock, 화살표, function 키
11. 자동차 움직이기 예제
import javax.swing.*;
import java.awt.*;
import java.awt.event.*;

public class MoveCar extends JFrame {
    int img_x = 150, img_y = 150;
    JButton button;

    public MoveCar() {
        setSize(600, 300);
        button = new Button("");       // 이미지 - 버튼으로 출력
        ImageIcon icon = new ImageIcon("car.png");   // 패키지 폴더에 있는 사진
        button.setIcon(icon);

        JPanel panel = new JPanel();
        panel.setLayout(null);
        button.setLocation(img_x, img_y);
        button.setSize(200, 100);

        panel.add(button)
        panel.requestFocus();

        panel.setFocusable(true);
        panel.addKeyListener(new KeyListener() {
            public void keyPressed(KeyEvent e) {
                int keycode = e.getKeyCode();
                switch(keycode) {
                case KeyEvent.VK_UP: img_y -= 10; break;
                case KeyEvent.VK_DOWN: img_y += 10; break;
                case KeyEvent.VK_LEFT: img_x -= 10; break;
                case KeyEvent.VK_RIGHT: img_x += 10; break;
                }
                button.setLocation(img_x, img_y);
            }
            public void keyReleased(KeyEvent arg0) { }
            public void keyTyped(KeyEvent arg0) { }
        });
        add(panel);
        setVisible(true);
        setDefaultCloseOperation(EXIT_ON_CLOSE);
    }

    public static void main(String[] args) {
        new MoveCar();
    }
}
12. Mouse, MouseMotion 이벤트
1) MouseListener 인터페이스
public class MyListener implements MouseListener {
    public void mousePressed(MouseEvent e) {  }   // 사용자가 컴포넌트 클릭한 경우
    public void mouseReleased(MouseEvent e) {  }  // 마우스가 컴포넌트에서 떼어진 경우
    public void mouseEntered(MouseEvent e) {  }   // 마우스 커서가 컴포넌트로 들어간 경우
    public void mouseExited(MouseEvent e) {  }    // 커서가 컴포넌트에서 나간 경우
    public void mouseClicked(MouseEvent e) {  }   // 마우스로 컴포넌트를 누른 경우
}
2) MouseMotionListener 인터페이스
public class MyClass implements MouseMotionListener {
    public void mouseDragged(MouseEvent e) {  } // 마우스를 드래그 한 경우
    public void mouseMoved(MouseEvent e) {  }   // 마우스를 클릭하지 않고 이동하는 경우
}
13. MouseEvent 객체

14. 어댑터 클래스
- 이벤트를 처리하기 위해서는 리스너 인터페이스에서 정의되어 있는 모든 메소드를 (사용하지 않더라도) 구현해야 함 -> 번거로움
- 어댑터 클래스를 이용하면 필요한 메소드만 재정의 가능
- 어댑터 클래스 : 인터페이스를 구현해놓은 클래스 -> 상속받기
public abstract class MouseAdapter implements MouseListener, MouseWheelListener, MouseMotionListener {
    public void mouseClicked(MouseEvent e) {}
    public void mousePressed(MouseEvent e) {}
    public void mouseReleased(MouseEvent e) {}
    public void mouseEntered(MouseEvent e) {}
    public void mouseExited(MouseEvent e) {}
    public void mouseWheelMoved(MouseWheelEvent e) {}
    public void mouseDragged(MouseEvent e) {}
    public void mouseMoved(MouseEvent e) {}
}
class MyLister extends MouseAdapter { // 리스너 클래스
public void mouseCliked(MouseEvent e) { // 필요한 메소드만 구현
if (e.getX > 300) { ... }
}
}'Software > JAVA' 카테고리의 다른 글
| [JAVA] Day11. 자바 그래픽 (5) | 2023.01.10 |
|---|---|
| [JAVA] Day10. 스윙 컴포넌트 (0) | 2023.01.09 |
| [JAVA] Day8. 자바 GUI 기초 (2) | 2023.01.08 |
| [JAVA] Day7. 자바 API 패키지, 예외처리, 모듈 (0) | 2023.01.02 |
| [JAVA] Day6. 추상클래스, 인터페이스, 중첩클래스 (0) | 2022.12.29 |